If you work with Photoshop a lot then you’re probably doing a lot of photo editing, from color correction to skin smoothing and other things. Today we’ll show you how to swap eyes in Photoshop in a few simple steps. So, without further ado, let’s get this started.
Step by Step Guide on How to Swap Eyes in Photoshop
Working with Photoshop makes our lives a lot easier, but knowing how to do each task is critical. If you’re a beginner, Photoshop won’t seem to be very user-friendly, so you’ll need to know what you want to do and prepare yourself beforehand. So, stay tuned, if you want to learn how to swap eyes in Photoshop.
Step 1: Open both pictures
Before you do any kind of editing, make sure the first thing that you want to do is eye swapping. In order to do that, at first, open both the pictures and keep each of them side by side. Now, go to the picture from where you want to take the eyes from.
Step 2: Create an outline
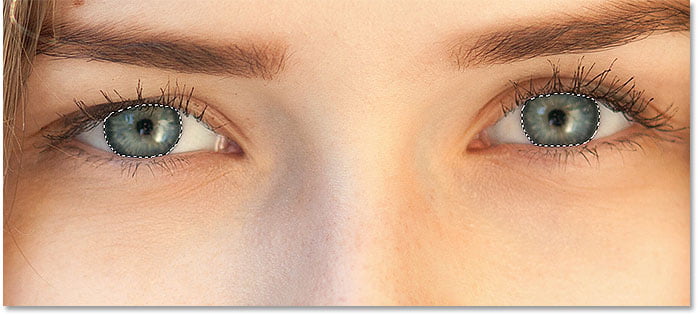
Now, go to the lasso tool and create an outline of the eye part and make sure to take some extra parts like the head portion and under eyes, and so on. After you have selected the eye part, now press Cmd+C for Mac or Ctrl+C for Windows. Now you are required to go to the picture where you want to adjust your eyes, and don’t forget to zoom in the picture.
Step 3: Bring the cropped portion
The following step is to click on Cmd+V for Mac or Ctrl+V for Windows and the previously cropped eyes will pop up on top of the picture so that you can edit the picture perfectly.
Step 4: Change the opacity
As soon as the swapped eyes will pop up, you will see the properties option on the right-hand side, from where you have to decrease the opacity from 100% to 50%. You will have to decrease the opacity in order to make the eyes a bit transparent so that you can also see the previous eye and make the process of swapping eyes more accurate and smooth.
Step 5: Resize and adjust the angle
Now, go to the layer option from the same properties option and click on Cmd+T or Ctrl+T. As soon as you do that the eye portion gets selected and now you have to resize the shape and change the angles. Since you can also see the previous eye portion, it makes the whole process easier to adjust the angles and resize the shape.
The whole process is a bit tough as you need to put the new eye portion on top of the previous one, and as expected, the expressions will not be the same so swapping eyes to the closest possible angle is all you need here. Once you have got your almost perfect angle, you have your new eyes on top of the old ones so, let it set.
Step 6: Insert layer mask
Now, go to the opacity option once again and increase the opacity again from 50% to 100% and once again select the Layer 1 option from the properties icon and go to the Layer Mask option from the bottom right corner. Once you get your layer mask, select the brush tool, and make sure the mode is on normal and opacity is on 100%. After this, select the layer option once again.
Note: If you happen to use a layer mask, then you must know if your layer mask is white then you need a black brush and if your layer mask is black then you need a white brush.
Step 7: Invert your layer mask
Therefore, you need to invert your layer mask, therefore select the right-hand side Layer 1 option, and switch it to black color by clicking on Cmd+I or Ctrl+I. As soon as you do that, the leftover portion of the new eyes around the face will disappear.
Step 8: Final touch
The next step is to click on the black layer which you have made and take the white brush and hover over the eyes so that you can fix the crookedness around the edges and make the eyes a bit bigger if needed.
After that, you can select the eye portion and make further changes. Lastly, click on the eye icon beside the layer option and you can see the previous photo and by clicking on the eye icon again, your new photo will appear. It makes your life easier to see and judge for yourself if you need any more corrections or not. Once you are done, your new picture is ready!
Frequently Asked Question
How to Enlarge Eyes in Photoshop?
Firstly open the photo and choose a layer that contains a photo of a face in Photoshop.
Optional: Before opening this face in Liquify this time, right-click or control-click the layer and select Convert to Smart Object. To open the image in the Liquify window, go to the Filter icon and then select Liquify from the drop-down menu.
Click the triangle to the left of Face-Aware Liquify in the Liquify window.
Tip: In Liquify, go to the Select Face option and choose the face you want to alter if there are multiple faces in a photo. To display sliders that only impact the eyes, click the triangle to the left of Eyes.
Now the next step is to drag the sliders to change the eyes’ size, height, width, tilt, and/or distance until you are satisfied with the effects. You may also make changes by clicking and dragging straight on facial features using face-aware liquify.
Select the Face Tool from the Liquify window’s left-hand Toolbar. Hover on one of the eyes in the photo until your cursor changes to a double-pointed diagonal arrow to change the size of the eyes.
Then, to make both eyes bigger, click on it and the hold, and drag outward. When you hover your mouse over a face feature, tooltips and on-image icons emerge, indicating which feature and property will change. To close the Liquify window, click on OK. To save the photo with the changes you made with Face-Aware Liquify, go to “File” and then “Save”.
Conclusion
It’s only normal that our actual expressions do not match our expectations in real-time. Most of the time, we notice that our facial expressions or minor adjustments in our expression have altered the entire shot after we’ve taken it. The majority of the time, we notice issues around our eyes or lips.
The most prevalent occurrence is when we capture images with our eyes closed, which requires the use of editing software. Photoshop has made it possible to alter practically anything, from color correction to shape changes of our expressions.
Hopefully, we were able to show you how to swap eyes in Photoshop in the easiest method possible in this blog. If you have enjoyed our blog, please do read our previous posts and leave us your valuable feedback.


