GIF simply stands for graphics interchange format in full form. In recent times, Gif is becoming more and more popular on the social media platform. From memes to simple images, Gif just adds more creativity to almost anything. This is why social media lovers post and share a huge number of Gif images on a daily basis. To keep up with the recent trend of the world, one must learn how to reverse a gif in photoshop.
How To Reverse a Gif in Photoshop
If you want to reverse a Gif from a set of images then you must follow these easy steps.
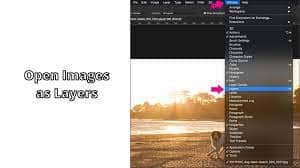
Step 1: Open Images as Layers
The very first task is to go to the “File” option and scroll down to “Scripts” and click on “Load files into stack” as this will open images as layers. Then a dialogue box will appear of “Load Layers” from where you need to click on “Browse” and select the files which you want to make Gif with.
After selecting all the files at once, click on “OK”. Now your images will open in photoshop and you will see the images are arranged in layers on the right-hand side of your screen.
Step 2: Reverse Your Images
Now go to the “Select” icon and click on the “All Layers” option, following the “Layer” icon, scroll down to “Arrange” and click on the “Reverse” option. After this, you can see, all the images are arranged in reversed form. Now, your work is to make a Gif because you have already reversed your images.
Step 3: Make a Gif
Now, let’s start by going to the “Window” icon and clicking on the “Timeline” option. After this, you will see a Timeline box appearing at the bottom of your images and from there, click on the drop-down gray lines icon that is at the right-hand corner of that box.
As soon as you click on that, a set of options will appear, make sure the two options: “Create New Layer for Each New Frame” and “New Layers Visible in All Frames“, both these options are ticked. Now go to the “Make Frames From Layers” option and these will create your frames in the timeline box. As soon as you get all the frames in the timeline, you need to select all these frames by pressing Shift-click.
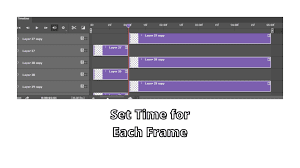
Step 4: Set Time for Each Frame
The following step is to set the time for each frame. At the bottom of each frame, there is a duration written below each frame, for instance, 0 sec. So, you are required to click on that and adjust your timing, for example, 0.5 sec.
The next task is to choose the number of times you want to repeat your Gif and that option is just below your frames. So, click on the downward-arrow just beside the Forever icon and as soon as you click on that, you can keep it to “Forever“, “3 times“, “Once“, or “Others“. By default, it is on the “Forever” option, however, if you like you can change it to as many times as you want but I have kept it on “Forever”.
Step 5: Reverse Your Frames
Now, once again you need to reverse your frames so you click on the drop-down three gray lines option on the right hand of the Timeline box. Then click on “Reverse Frames” and now all your frames will be in reversed form.
Optional: If you want to see if your Gif is reversed properly or not, press on the play option.
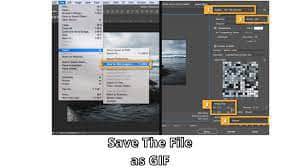
Step 6: Save Your Gif
Now the last step is to save your Gif so, go to “File” and scroll down to “Save for Web”, here a dialogue box will appear. As soon as the dialogue box appears, you need to see if the file format is in Gif or not, if not then make it to Gif.
Then have a look at the image size, the height and width are given in pixels so that you can change it if required, and if not then click on “Save”. Another dialogue box will appear followed by that one, here you can change the name of your file if you wish or otherwise click on “Save” once again.
Now your file is ready to roll, open the file and see your Gif in a reversed form. Congratulations! You’ve just reversed your GIF using photoshop. So, put it up on the internet and flaunt it to the rest of the world.
Frequently Asked Question
What Is the Average Gif File Size?
A Gif file is typically around 2.4 KB in size.
In Photoshop, How Do You Retime a Gif?
To open the Retime Menu, right-click on the timeline. Then select “Speed” from the drop-down menu. The speed slider will appear as a result of this and depending on whether you want to slow down or speed up the GIF, move the slider up or down.
What’s the Best Way to Figure out Where a Gif Came From?
Simply click on the GIF to switch to the source video. Then you’ll be able to see where it originated from.
Conclusion
Gif posts are fun to watch as it gives a quick glimpse of everything in a few seconds. It does not waste much time and also gives an animated feel to your boring image. Photoshop users implement many different ways in order to create an outstanding post for us and Gifs are undoubtedly the best way. At this stage, I hope you know how to reverse a gif in photoshop as we have tried to break down the steps in the easiest way possible only for you. If you have loved our post then do read our previous blog posts and do not forget to leave your valuable opinions in the comment section.